To fully customize your Disney Plus experience, you can set different language options for the app interface, audio, and subtitles based on your preferences and device. Disney Plus supports a broad range of languages, offering users flexibility in how they watch content. This guide provides an in-depth look at the available languages and step-by-step instructions on changing language settings for individual movies or shows, the entire app interface, and even on specific streaming devices like Roku, Apple TV, and Fire TV.
Available languages on Disney Plus:
Disney Plus offers a wide range of languages for both audio and subtitles, though availability can vary by title and location. Here’s a list of commonly supported languages on Disney Plus:
Core Languages for Most Content:
- English (UK and US)
- Spanish (Latin America and Spain)
- French (Canada and France)
- Dutch
Additional Language Options (Often for Disney+ Originals and Popular Titles):
- Danish
- Finnish
- German
- Italian
- Japanese
- Korean
- Norwegian
- Portuguese (Brazil and Portugal)
- Swedish
- Chinese (Simplified, Traditional, and Hong Kong)
- Czech
- Romanian
- Slovak
Subtitle-Only Options:
Some languages are available only as subtitles or closed captions, depending on the content. Disney Plus continues to expand its language options, especially for subtitles, to make content more accessible globally.
Changing Language Within a Show or Movie:
Disney Plus makes it easy to switch audio and subtitle language settings within each show or movie. This is particularly helpful if you want to watch a specific title in a different language without changing the entire app’s language setting.
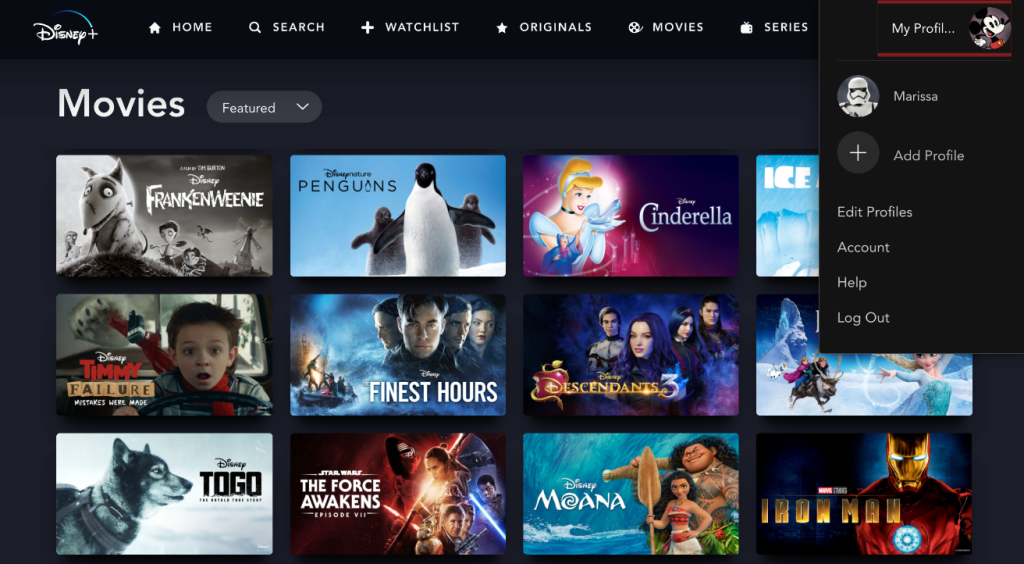
- Open Disney Plus: Start by logging into the Disney Plus app or website on your device.
- Select a Movie or Show: Choose the title you’d like to watch and begin playing it.
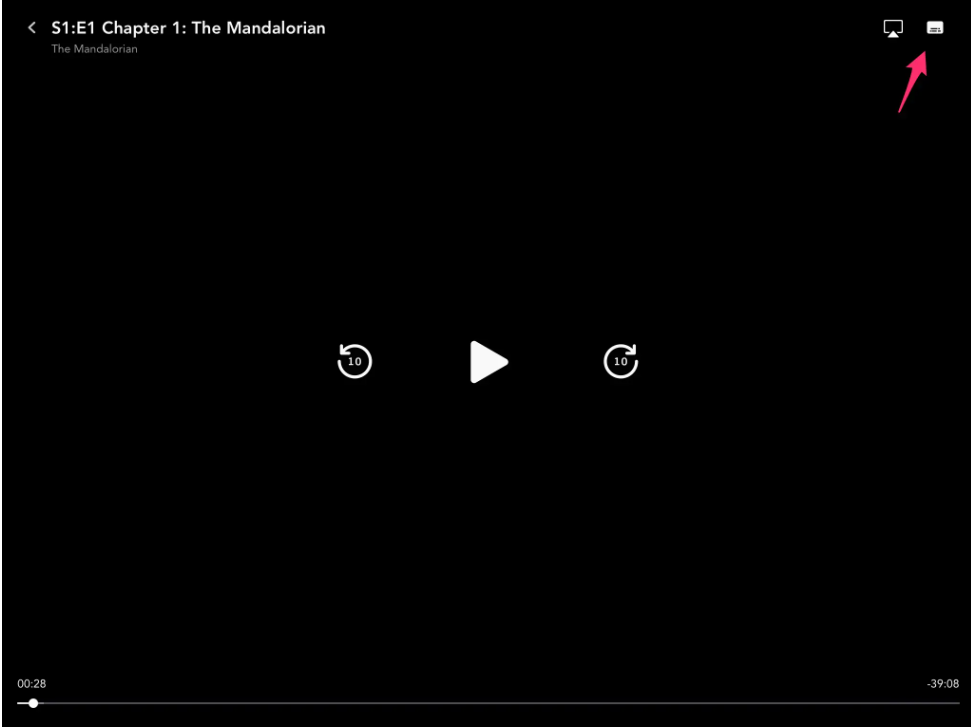
- Access the Settings Menu: Once the title is playing, pause it and locate the Settings icon. This icon typically appears as a small screen icon or a speech bubble in the upper right-hand corner of the screen.
- Choose Audio and Subtitle Languages:
- In the left column of the settings window, select your desired audio language.
- In the right column, choose your preferred subtitle language or opt to turn subtitles off.
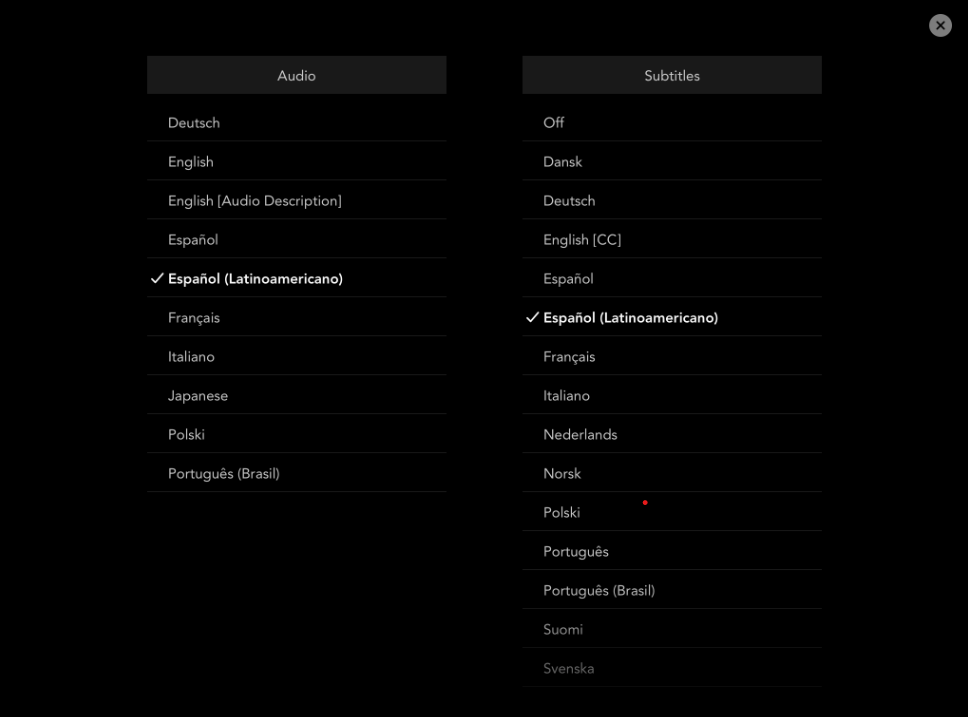
- Save Your Settings: Once you’ve selected your audio and subtitle preferences, close the settings menu by tapping the X or back arrow.
Note: These settings are specific to the selected title, so you’ll need to repeat the process for other shows or movies if you wish to watch them in a different language. If you have multiple profiles on the account, each user can individually set their own audio and subtitle preferences.
Changing Profile Language In App Interface:
To change the language for the entire Disney Plus interface, you’ll need to adjust the language setting for your specific profile. This method will change the language used in the menus, navigation, and other app interface elements across the profile.
- Go to the Profile Menu: Click on the My Profile tab, located in the upper-right corner of the Disney Plus home screen.
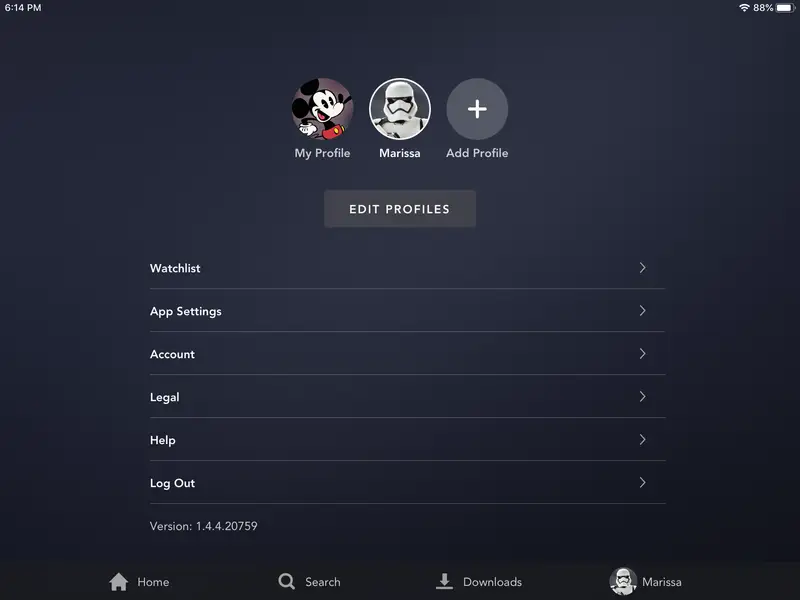
- Edit Profile: Select Edit Profiles and choose the profile for which you want to change the language.
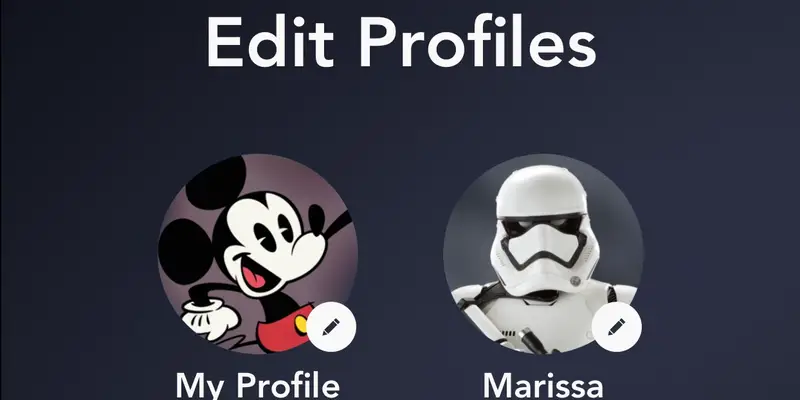
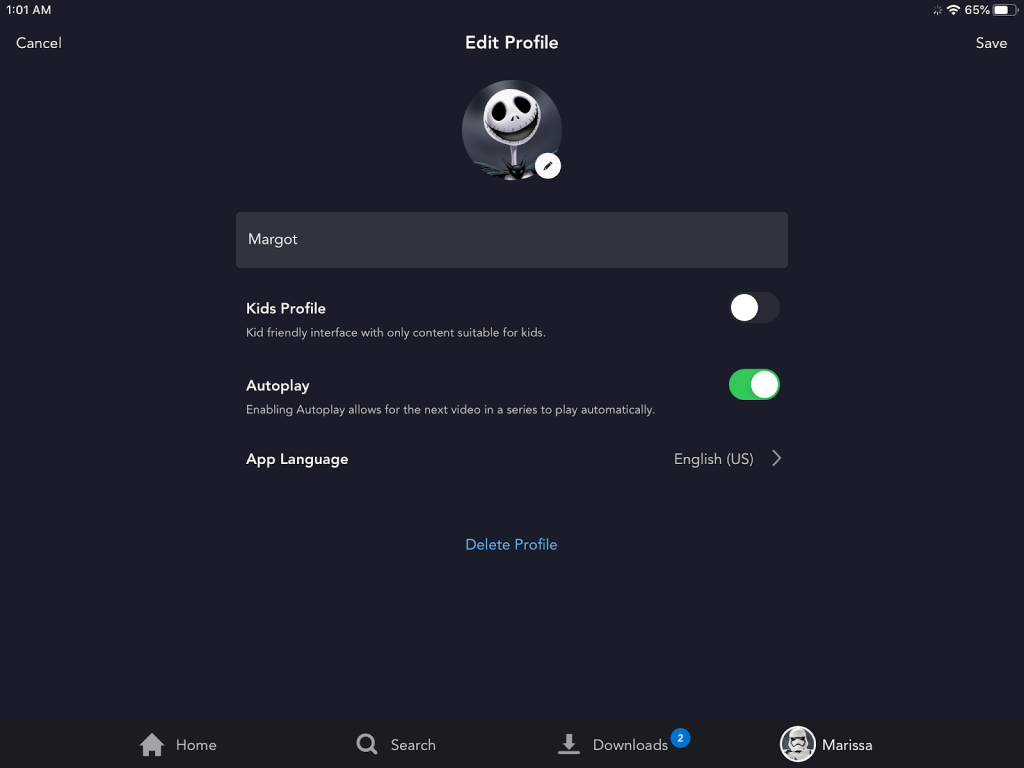
- Select App Language:
- Look for the App Language dropdown option. This option is usually located under profile customization features such as avatar and color settings.
- Choose Your Language: From the dropdown menu, select the language you want for the interface.
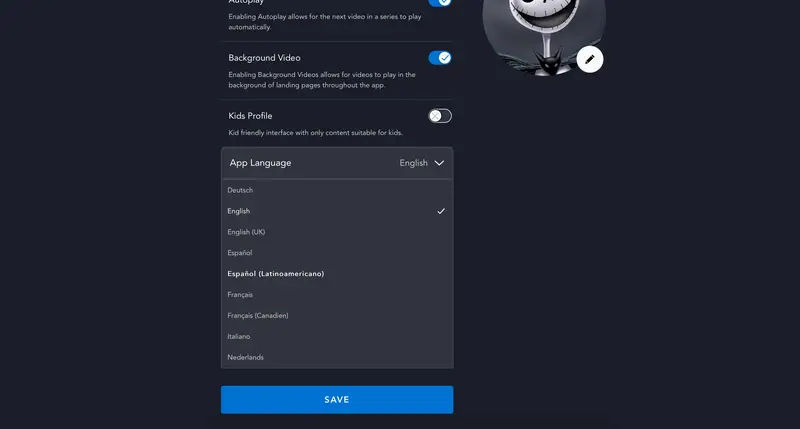
- Save Your Changes: Once you’ve chosen your preferred language, click the Save button. The app interface will refresh and display all menus, options, and navigation in the new language.
This change only applies to the selected profile, so if you have multiple profiles, you’ll need to repeat this process for each profile if you want all users to have the same language setting.
Changing the Disney Plus Language via Device Settings:
If you’re streaming Disney Plus on a device like Roku TV, Apple TV, or Fire TV, you can change language settings directly through the device’s settings. This is useful if you want a consistent language experience across different apps on that device, including Disney Plus.
Roku TV:
Starting at £29.99, Roku devices offer HD to 4K streaming with options like the Roku Express for basic needs and the Roku Ultra for advanced 4K HDR and Dolby Vision features. It’s an affordable and user-friendly option for versatile streaming.
Changing the language settings on Roku TV is quick and can be done directly while streaming on Disney Plus:
- Start Streaming: Begin playing a show or movie on Disney Plus using your Roku device.
- Access the Language Settings:
- Press the Star button on your Roku remote to open the language menu.
- Choose Your Language: Select your preferred language from the menu options on the left side of the screen.
Tip: If you want your language preferences to extend beyond Disney Plus to the entire Roku device, you can also adjust the language settings directly within the Roku settings menu.
Apple TV:
Apple TV HD (£139) and Apple TV 4K (from £149) deliver high-quality streaming with advanced features, including Dolby Atmos and HDR10+. Ideal for Apple ecosystem users, it offers seamless integration and top performance.
Apple TV offers an intuitive way to change audio language settings directly within the Disney Plus app and across other streaming apps:
- Open Disney Plus: Launch the Disney Plus app on your Apple TV and choose the content you’d like to watch.
- Access Audio Options:
- While the title is playing, swipe down on the Apple TV remote to open the language options menu.
- Select Audio: Under the Audio section, pick your preferred language.
Apple TV also allows you to set preferred languages for other streaming apps, making it a convenient option if you watch a mix of content on different platforms.
Fire TV :
Fire TV devices range from £29.99 for the basic Fire TV Stick Lite to £139.99 for the Fire TV Cube. They support up to 4K UHD, offer Alexa hands-free control on select models, and are popular for their compatibility and value.
For Fire TV users, changing the language settings can be done directly within the Fire TV’s system settings, allowing you to have a consistent language experience across Disney Plus and other apps:
- Open Settings on Fire TV: Navigate to the Settings menu on your Fire TV.
- Go to Preferences: Within the settings menu, select Preferences.
- Set Language Preferences: Choose your preferred language for Disney Plus as well as other apps on the Fire TV.
Quick Tip: Changing the language in Fire TV settings will impact the language used in other apps as well, making this ideal if you’d like consistency across your streaming experience.
Troubleshooting Language Changes:
If you experience difficulties with language settings, try the following steps:
- Clear Cache: Sometimes, app data can create issues with language changes. Clearing your device’s cache or reinstalling the Disney Plus app can resolve these issues.
- Restart the App: After making language changes, restart the Disney Plus app to ensure the new settings take effect.
- Check Your Profile Settings: If the language doesn’t update, double-check your profile settings to confirm that the changes are saved properly.
How to Change the Disney Plus Language to English?
If you’ve previously set Disney Plus to a regional language and wish to switch it back to English, follow these simple steps:
Steps to Change to English:
- Open Disney Plus: Launch the Disney Plus app on your device or visit the Disney Plus website on your computer.
- Access Your Account: Click on your profile icon in the top-right corner.
- Edit Profiles: Select Edit Profiles from the dropdown menu.
- Select Language:
- Choose the profile you want to modify.
- From the App Language dropdown, select English.
- Save Changes: Click Done to confirm your changes.
Now, your Disney Plus interface and content will be displayed in English for that profile.
How to Change Subtitles on Disney Plus?
Changing subtitles is straightforward, allowing you to enjoy visual dialogue cues in your preferred language.
Steps to Change Subtitles:
- Launch the App: Open the Disney Plus app or website.
- Select a Title: Play the show or movie you want to watch.
- Access the Subtitle Menu:
- While watching, pause the content.
- Click the Settings (speech bubble) icon in the top-right corner.
- Choose Your Subtitle Language:
- In the Subtitle section, pick your desired language.
- Resume Watching: Close the menu, and the subtitles will now be displayed in the selected language.
With these quick steps, you can enjoy your favorite Disney Plus content with English language options or subtitles in any language you choose!
Making the Most of Language Options on Disney Plus:
With these language settings, Disney Plus offers a highly customizable experience for users worldwide. Whether you want to watch your favorite movies in another language or enjoy foreign-language films with subtitles, these options allow you to tailor your experience. The ability to set different languages per profile means families can enjoy a multilingual experience without adjusting settings each time someone logs in.
Additional Tips for Optimizing Your Language Settings on Disney Plus:
- Check Language Availability: Not all content on Disney Plus is available in every language. Popular movies and series often have more language options.
- Update Your App: Ensure your Disney Plus app is updated, as new language features or options are periodically added.
Conclusion:
Changing the language on Disney Plus is quick and user-friendly, offering customization at the app, profile, or content level to enhance your viewing experience.
Top 3 tips for a seamless language change:
- Adjust your app’s interface language in profile settings.
- Modify audio and subtitle preferences for specific content.
- Ensure the latest app update for optimal functionality.
With these steps, you’re ready to enjoy Disney Plus in your preferred language. Head to Disney Plus now, set your preferences, and immerse yourself in a world of personalized entertainment!
FAQs:
Yes, Disney Plus allows you to change the language for specific movies and shows. While playing content, click on the Audio & Subtitles icon, then select your preferred audio and subtitle languages.
Disney Plus offers a wide range of languages, including but not limited to English, Spanish, French, German, Italian, Dutch, and Portuguese. However, the availability of languages may vary depending on the content.
To change the language of the entire Disney Plus app, go to your profile, select “App Settings,” then “App Language.” From there, choose your preferred language for the interface.
No, each Disney Plus profile can have its language settings. This allows different users to have personalized language preferences without affecting other profiles.
Some content may not be available in every language due to licensing and regional availability. Disney Plus typically offers a wider selection of language options for popular titles.

Hi, I’m Smrithi! As an avid writer, I specialize in entertainment and streaming services. I love guiding readers through the complex world of digital media with simple, engaging advice. Join me to discover the best in entertainment and how to stream it seamlessly!
