
Is your Disney Plus Dolby Atmos not working on your TV? Don’t worry. We’ve got you covered.
The majority of online guides for fixing your Disney Plus Dolby Atmos are outdated. Therefore, we have curated this guide, where we’ll take you through
some of the advanced troubleshooting steps to get your Dolby Atmos up and running.
Let’s take a look at some general troubleshooting steps first.
Common Issues with Dolby Atmos on Disney Plus:
When in trouble, try to solve minor issues first. Here are some general troubleshooting steps you can consider :
General Troubleshooting Steps:
- Check your plan: Ensure you are subscribed to the Disney+ Premium Plan, which supports Dolby Atmos. The Basic plan does not offer this feature.
- Content Compatibility: Verify that the specific content you want to watch on Disney Plus has Dolby Atmos support. Look for the Dolby Atmos badge in the title’s details.
- Internet speed: A stable and fast internet connection is crucial. Disney Plus recommends a minimum of 25 Mbps for streaming 4K UHD content, which is typically required for Dolby Atmos.
- App restart: If you’re experiencing audio issues, try restarting the Disney Plus app. Fully close the app and then reopen it to refresh the connection.
Technical Troubleshooting:
Before diving into software settings, it’s crucial to ensure your hardware is correctly set up for Dolby Atmos:
Hardware Checks:
You need to do hardware checks first; ensuring your cables are connected correctly and your device is compatible is crucial.
- TV compatibility:
Not all TVs support Dolby Atmos directly. However, this doesn’t mean you can’t enjoy Atmos audio.
The key requirement is that your TV must have an ARC (Audio Return Channel) or eARC (enhanced Audio Return Channel) HDMI port.
These ports allow your TV to send audio, including Dolby Atmos signals, to an external audio system like a soundbar or AV receiver. So, even if your TV doesn’t process Atmos internally, it can still act as a pass-through for Atmos content.
- HDMI connections:
Your HDMI cables matter to fully enjoy Dolby Atmos. While HDMI 2.0 cables can transmit Dolby Atmos signals, they might have limitations.
For the best experience, especially when using eARC, it’s recommended to use HDMI 2.1 cables. These cables offer higher bandwidth, ensuring seamless transmission of high-quality audio formats like Atmos without any loss in quality.
- Soundbar or AV receiver:
Not all soundbars or AV receivers are created equal when it comes to Dolby Atmos. It’s essential to verify that your audio device specifically supports Atmos.
Check the product specifications or user manual to confirm compatibility. Some devices might advertise “virtual surround sound” or “3D audio,” but these aren’t the same as true Dolby Atmos.
- Cable connections:
It might seem trivial, but loose cable connections are a common culprit for audio issues. Ensure that all HDMI cables, optical cables (if used), and power cords are securely plugged in. Even a slightly loose connection can cause intermittent audio dropouts or prevent Atmos from engaging properly.
Software and Settings Adjustments:
Many times, the issue can be in your device settings, and making the right setting adjustments is crucial, so let’s take a look at some software and settings adjustments you can make:
Disney Plus app settings:
Step 1: Open the Disney Plus app settings. This is usually done by clicking on your profile icon or a gear/cog symbol.
Step 2: Navigate to the ‘Audio’ section. It might be nested under ‘Playback’ or ‘Video and Audio’ settings if you don’t see it immediately.
Step 3: Select ‘Auto’ to let Disney Plus choose the best audio format based on your device and internet speed. If available, you can also manually choose ‘Dolby Atmos.’
However, note that even with ‘Auto’ selected, if your setup supports Atmos and the content offers it, you should get Atmos playback.
TV audio settings:
Step 1: Access your TV’s audio settings. This is usually done through the TV’s main menu or by pressing a dedicated button on your remote labeled ‘Audio’ or ‘Sound.’
Step 2: Look for settings labeled ‘Dolby Atmos,’ ‘Passthrough,’ or ‘Bitstream.’ Enabling these allows your TV to pass Atmos signals through to your soundbar or AV receiver without altering them.
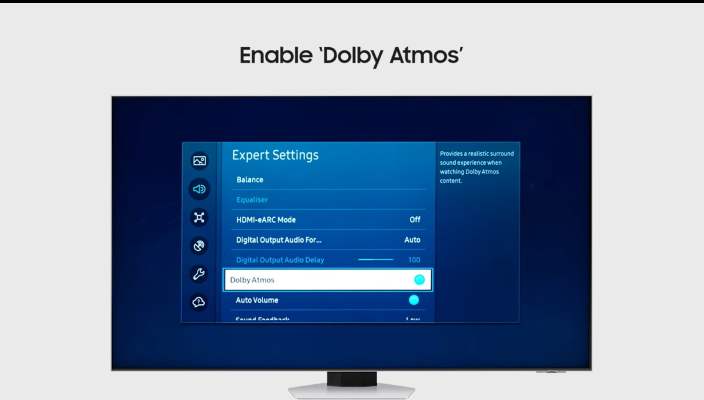
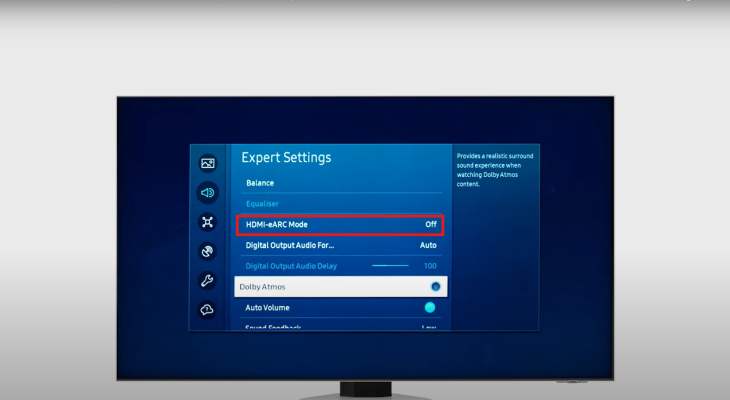
Step 3: If your TV supports eARC, make sure it’s activated. eARC offers higher bandwidth than standard ARC, ensuring full-quality Atmos transmission. This setting might be under ‘HDMI settings’ or ‘Advanced Audio settings.
Update firmware:
TV firmware updates can introduce new features or fix bugs that might be hindering Dolby Atmos. Check your TV manufacturer’s website or use the TV’s built-in update feature to ensure you have the latest version.
Similarly, soundbars and AV receivers receive firmware updates that can improve Atmos performance or add support for it. Use the manufacturer’s app or website to check and apply updates.
Don’t forget the Disney Plus app itself. Streaming apps frequently update to improve compatibility with audio formats. Always keep the app updated to ensure the best audio (and video) performance.
By checking these hardware and software aspects, you significantly increase your chances of enjoying Dolby Atmos on Disney Plus.
Step-by-Step Guide to Fix Dolby Atmos on Disney Plus
Here’s a detailed step-by-step guide for setting up Dolby Atmos on various devices:
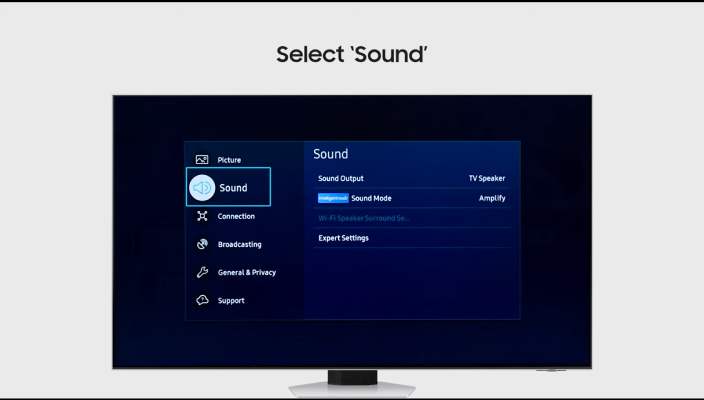
Smart TVs (LG, Samsung, Sony):
- Press ‘Home’ on your remote to access the main menu.
- Navigate to ‘Settings’ using the arrow keys and select it.
- In the settings menu, go to ‘Sound’ and then select ‘Sound Output’.
- Choose the output device that you’re using for Dolby Atmos, such as a soundbar or AV receiver.
- Enable ‘Passthrough’ or ‘Bitstream’ mode to allow Dolby Atmos audio to pass through to your external device.
Apple TV 4K:
- On the Apple TV home screen, go to ‘Settings’.
- Scroll down and select ‘Video and Audio’.
- Set ‘Audio Format’ to ‘Auto’ to allow the Apple TV to select the best audio format automatically.
- Ensure ‘Surround Sound’ is enabled to use multi-channel audio.
- Turn on ‘Home Theater Calibration’, if available, to optimize audio based on your room’s acoustics.
Advanced Troubleshooting Techniques:
The steps given below will help you resolve the issue immediately without any hassle.
- Network settings: Switching from Wi-Fi to Ethernet can indeed provide a more stable connection.
This is because Ethernet connections are less prone to interference and can offer higher speeds, especially if you’re far from the router or if there are multiple Wi-Fi networks in your area.
- Audio mode cycling: Cycling through audio modes can sometimes resolve issues with Dolby Atmos.
However, it’s important to ensure that your device supports Dolby Atmos and that it’s properly configured. If cycling through ‘Stereo’ and then back to ‘Dolby Atmos’ doesn’t work, you may need to check your device’s audio settings or consult the manufacturer’s guide for troubleshooting steps.
- Factory reset: Resetting your TV or audio device to factory settings can solve persistent issues, but it will erase all personalized settings and data.
Before proceeding, it’s crucial to note down any specific settings you wish to restore afterward.
The process for a factory reset varies by device, so refer to the user manual or manufacturer’s website for instructions specific to your model.
Contacting Customer Support:
If you’ve tried everything and Dolby Atmos is still not working on Disney Plus, it’s time to contact support:
1. Visit the Disney Plus Help Center
2. Choose ‘Live Chat’ or ‘Call Us’
3. Explain your issue and the steps you’ve taken
4. They may have additional troubleshooting steps or need to escalate your issue
Conclusion:
Summarizing the steps you can follow and easily fix to get Dolby Atmos audio experience for your next streaming session,
- Check your plan
- Content compatibility
- Internet speed
- App restart
We’ve specified all the steps and actions that you can take to fix the Disney Plus Dolby Atmos issue and enjoy your favorite Disney content with immersive audio.

Hi, I’m Smrithi! As an avid writer, I specialize in entertainment and streaming services. I love guiding readers through the complex world of digital media with simple, engaging advice. Join me to discover the best in entertainment and how to stream it seamlessly!